
Table Planner
Use this page to design your floor layout — create areas (Indoor, Rooftop, etc.), add tables, drag them on a snap grid, then Save Layout. Used by reservation timeline and floor views.
Open the screen: Sidebar → Settings → Table Planner
Plan and permission
Requires TABLE PLANNERS permission. Not behind the table-reservation add-on.
Two kinds of save
Save Layout — position, rotation, shape, chair placement on canvas. Add / Edit / Duplicate Table dialogs — name, seats, area, and flags save immediately to the API.
Floor layout editor
What it does
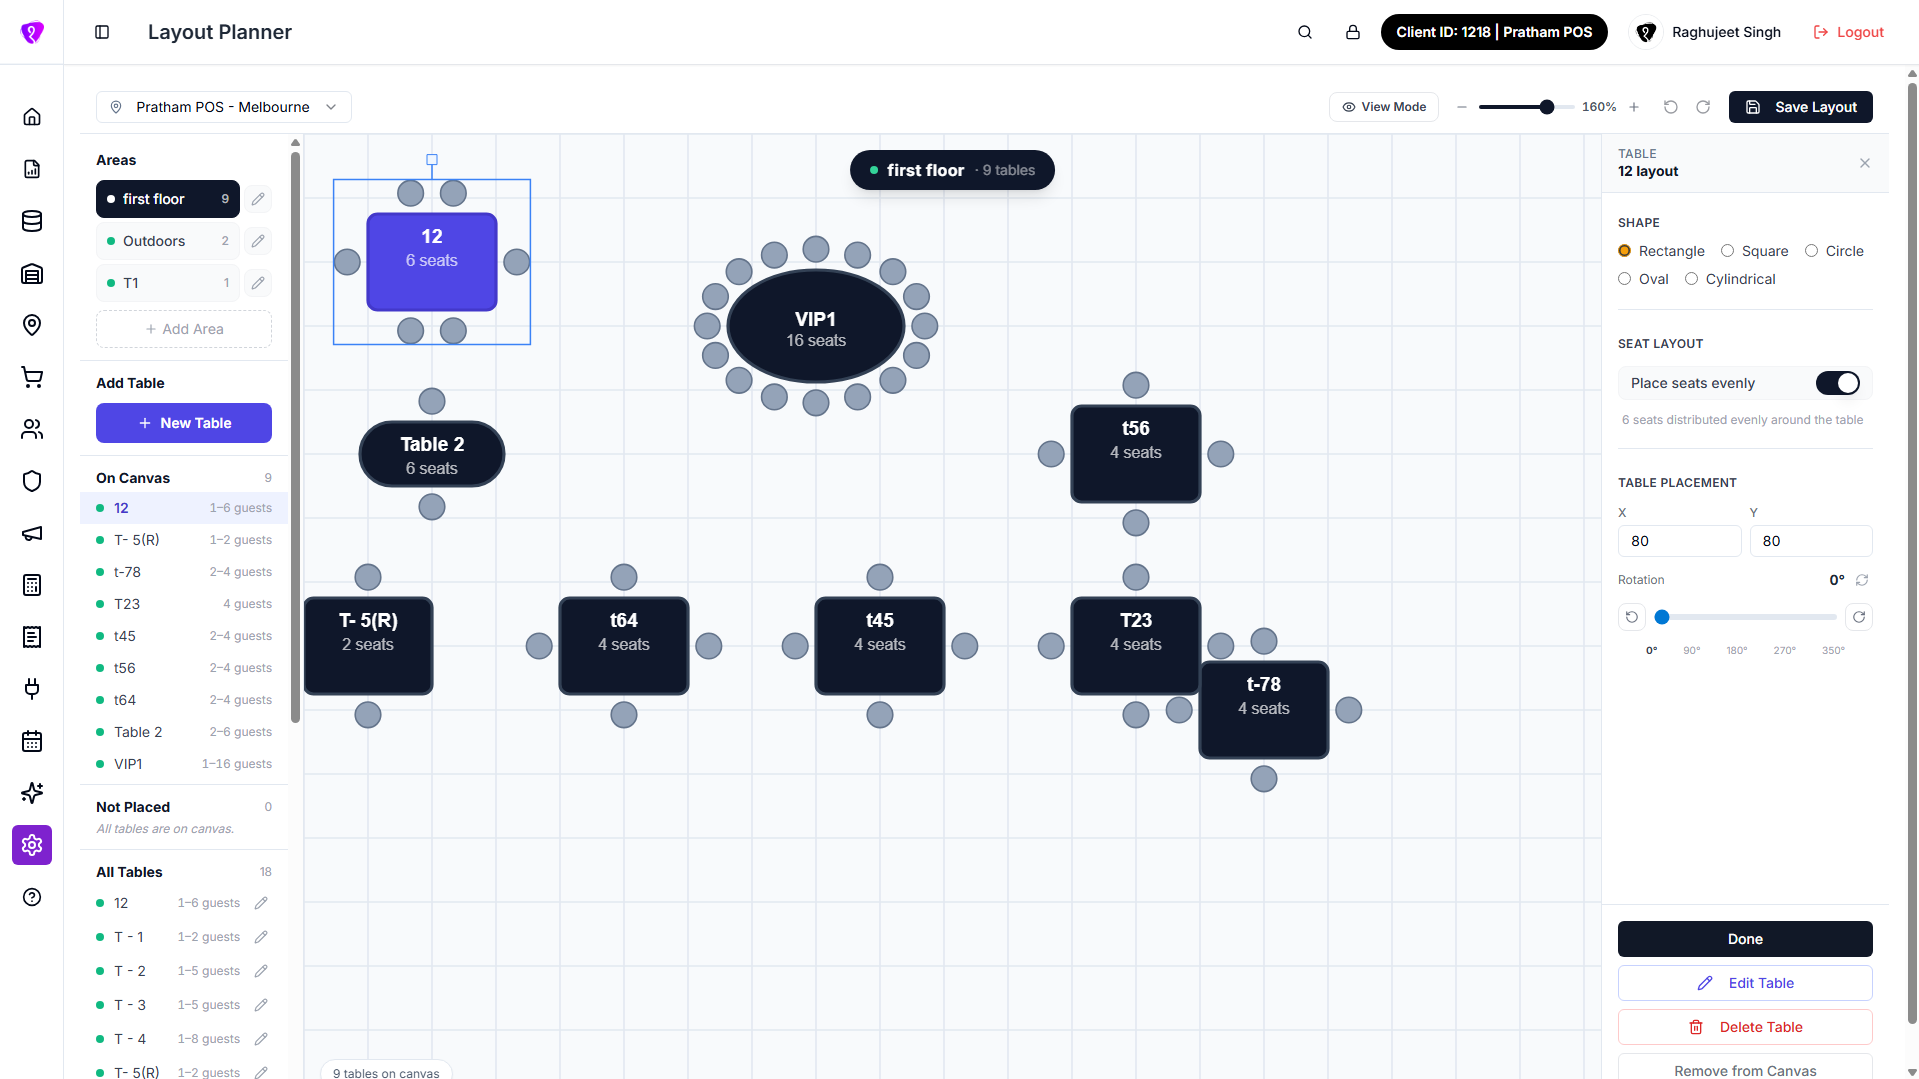
Full-screen editor: location picker and toolbar on top; left panel (areas and tables); canvas in the centre; right panel when a table is selected. In View Mode, only the canvas shows (read-only overview).
Step-by-step
- Pick location (first outlet auto-selects).
- Add Area in the left panel — tables must belong to an area.
- Tap New Table, fill the form, tap Add Table.
- Drag tables on the grid; tap one to open the layout panel for rotation and seats.
- Tap Save Layout before you leave or switch location.
Add and edit areas
Areas are dining zones (e.g. Indoor, Patio). Every table belongs to one area.
Add an area
- In the left panel under Areas, tap Add Area.
- Enter Area Name — placeholder e.g. Indoor, Rooftop…
- Set Available Offline and Available Online (both default on).
- Tap Add (or Cancel / Escape to close).
- Success: Area added — "{name}" created.
The first area is auto-selected when the list loads.
Edit an area
- Tap the pencil icon on the area row.
- In Edit Table Area, change Area Name, Active, Available Offline, or Available Online.
- Tap Save.
- Success: Area updated.
Delete an area
- Trash icon appears only when the area has 0 tables.
- Tap Trash → confirm in Delete Area.
- Success: Area deleted.
Tap an area name to filter the canvas to that area only. A banner on the canvas shows the area name and table count.
Add and edit tables
Add a new table
New Table is disabled until at least one area exists.
- Select the area you want (optional — dialog uses the selected area).
- Tap New Table.
- In Add New Table:
| Field | What to enter |
|---|---|
| Table Name | Required — e.g. Table 5, T-05, VIP-1 |
| Shape | Rectangle, Square, Circle, Oval, or Cylindrical |
| Min Seats / Max Seats | 1–20 (defaults 2 and 4) |
| Priority | Optional number |
| Active | On by default |
| Available Offline / Available Online | Per-table channel toggles |
- Tap Add Table (Adding… while saving).
- Success: Table added — table is placed on the canvas automatically.
Edit a table
From All Tables (pencil icon), the canvas quick-action chip, or the right panel Edit Table button:
- Open Edit Table.
- Change name, shape, Table Area, min/max seats, priority, or toggles.
- Tap Save Changes.
- Success: Table updated — no Save Layout needed for these fields.
Duplicate a table
- Tap Copy on a table row or on the canvas chip.
- In Duplicate Table, enter a new Table Name (suggested name pre-filled).
- Tap Create Table.
- Success: Table duplicated — copy appears on the canvas.
Delete a table
Canvas chip, right panel, or list → Delete → confirm Are you sure you want to delete "{name}"? → Delete.
Not placed tables
Tables without a canvas position appear under Not Placed. Tap + to Add to canvas.
Canvas and layout panel
Canvas
- 40px snap grid. Drag to move; tap to select; tap empty space to deselect.
- Rotate with the handle on the selected table, or use the right panel slider.
- Selected table shows a chip: Duplicate, Edit, Delete.
Right panel ({name} layout)
- Shape, Place seats evenly (or manual Top/Bottom/Left/Right chairs), X / Y, Rotation.
- Remove from Canvas — table stays in the system but moves to Not Placed.
- Done closes the panel; use Save Layout to persist canvas changes.
Toolbar
| Control | What it does |
|---|---|
| View Mode / Edit Mode | Read-only zone overview vs editing |
| Zoom | 40%–200%; tap % to reset to 100% |
| Undo / Redo | Session only — still need Save Layout |
| Save Layout | Layout saved — N table(s) updated successfully. |
Save before leaving
Drag and rotate changes are lost on refresh until you tap Save Layout. Switching location without saving also loses unsaved layout work.
Common mistakes / FAQs
- New Table disabled. Create an area first.
- Cannot delete area. Remove or reassign all tables in that area first.
- Name or seats wrong on POS. Use Edit Table, not only the layout panel.
- Undo after reload. Undo is local; only Save Layout writes to the server.
View mode
Tap View Mode for a read-only map: areas as coloured zones, All Areas and per-area chips in the top bar. Left panel, save, and undo are hidden. Tap Edit Mode to change the layout.
Permissions
| What you need | Why |
|---|---|
| TABLE PLANNERS — READ | Open planner, view mode |
| TABLE PLANNERS — CREATE | Add areas and tables |
| TABLE PLANNERS — UPDATE | Drag, save layout, edit |
| TABLE PLANNERS — DELETE | Delete tables and empty areas |